I have a different sort of post for you today. I am featuring some handmade crafts of a friend of mine, as she has just started to make these as a side business and wanted to get some people interested and get the word out. So I was all too happy to help out! My good friend, Ashley, makes these adorable hair pins and YOU have the opportunity to win one today. Ashley and I met my freshman year of college when we ended up sitting near each other (and always arriving very early to class) in our Nutrition and Health. And we've stayed great friends ever since. We even walked together at graduation this past December. What I love most about her is the way she "gets me". Just like great friends are supposed to! PippasProjects is a homemade craft business. Ashley specializes in canvases and hair accessories. All of the items are made by Ashley. Ashley was born and raised in Northwest Arkansas and loves the HOGS! Currently Ashley has an instagram account for her business which is @PippasProjects . You can also email at [email protected]. Here are some examples of some adorable crafts Ashley has made. 
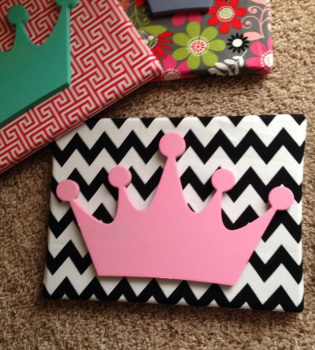
Pink crown decorative canvas. This would go great in a little girl's room or even a gift for a sorority girl More decorative canvases she makes. These would be great to use as bulletin boards or photo holders. 
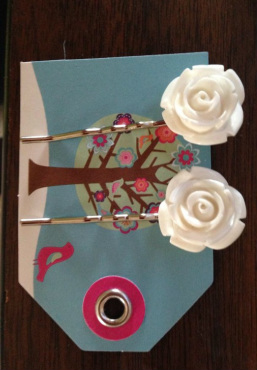
I told Ashley I'd love to help spread the word about her new found side business so I thought a fun giveaway would be appropriate! Ashley has decided to giveaway these lovely white rose hair pins to one lucky winner. The Bobbi pin is 18 mm. The flowers are 1/2 inch to 3/4 inch depending on the fold of the flower. Simply use the widget below to enter. I'll notify the winner exactly one week from today. Good luck!!
Spring is finally here! Every year I celebrate the arrival of Spring. Probably even more than the average person. Why? Because I'm telling you, my body was just not cut out for cold weather. No sir. And I think we can all agree that this past Winter just seemed particularly brutal for everyone around the country. I got so sick of seeing the color white, I swore to my mother that it just might influence me to never even buy my future wedding dress in a white color. We had the most snow and/or ice days here than we've ever had as long as I've been alive. Those poor kids are going to be making up missed school days for a long time. Might even take up half of their summer! The point is, Mother Nature sure as hell took her time on scheduling the Spring weather to finally arrive. And now that Spring has officially started, I know those of us here in Northwest Arkansas can finally breathe a sigh of relief (or perhaps it should be breathe IN the smell of the new flowers in bloom?...) that Spring weather has decided to make an appearance with it. The daffodils are in bloom, the ground is finally a different color most of the time other than white, and people just seem overall more cheerful in their demeanor. With the arrival of Spring, I felt the need to celebrate with creating this Spring Green Pistachio Cake. I wasn't sure to call it a cake or a bread, but the consistency did seem just a bit more cake-like. Plus I didn't know what exactly to call a cake/bread hybrid other than a "break" and that just didn't seem right. This cake is super simple to make. You just mix all the ingredients in one bowl, put it in a prepared bread pan and bake! I decided to chop the pistachios in a food processor because I liked them ground more finely into tiny pieces. You could chop them if you prefer bigger chunks of pistachios in your cake. Spring Green Pistachio Cake Ingredients: 1 yellow box cake mix ( oz.) 1 box sugar-free, fat-free pistachio pudding mix (1 oz.) 1/2 cup egg beaters (or 4 egg whites) 1/4 cup unsweet applesauce 1/4 cup reduced fat sour cream 1/4 cup vanilla greek yogurt 1/3 cup unsweetened almond milk (or whatever milk you have) 1/2 tsp. vanilla extract 3/4 chopped, salted pistachios 3-4 drops green food coloring Directions: Pulse the salted pistachios in a food processor. I pulsed them into more of a powder than actual chunks of nuts, but it's your personal preference. Preheat oven to 350 degrees and grease a 8.5 x 4 1/4 x 2 3/4 inch loaf bread pan. I used melted coconut oil to grease the pan. Put all ingredients into a large bowl. Using a hand beater or stand mixer, blend until all the ingredients are just well incorporated together. Pour the mixture into the prepared bread pan and bake in oven for 38-42 minutes. Allow the bread to cool for at least 10 minutes before taking out of pan to continue cooling. Slice, eat, and enjoy! Healthy Recipe Tidbits
I want to go to the beach. Is that too much to ask? Is anyone going anytime soon and wants to take me with them?....I'm craving warm weather, sunshine, laying out on a towel and sipping fruity cocktails in glasses with cute little umbrellas. Really, I'm just craving a vacation if I'm to be truly honest. I want to explore some new city! See new sites! Or relax on a beach with absolutely no cares or worries in the world! The beach vacation is always my first choice--if I can eventually move or even retire near the beach my life will be complete. The last time I actually go to enjoy a vacation near a beach was when I went on a road trip with Wade down to Destin, Florida in Winter 2012. We stayed with his grandparents that live near Destin. It was, however, during the Winter time so it wasn't actually the warmest of beach vacations. I'd much rather go back when the sunshine is out in full force, the highs are near 85 degrees every day and I can actually get a tan! No tan to come back with from that vacation...but I did have a great time with Wade. We made a lot of memories on that trip and I had a lovely vacation with that handsome man. Now I just have to convince him that we ARE moving near a beach someday. No matter how much a "beach" setting isn't quite his idea of the perfect place to live. Since I can't up and leave my responsibilities behind right at this moment and head to a beach, I'll just settle for dreaming of it while indulging in this decadent toasted coconut banana cream pie. It has a very tropical and beachy theme in my opinion. This pie was so damn good! Definitely one of the best pies I've ever made and I'm keeping this recipe handy to use when I"m in need of an easy and quick pie recipe in the future. Plus the best part is, this is a slimmed-down version too so the calories, fat, and sugar are all reduced and yet you'd never be able to tell! Toasted Coconut Banana Cream PieIngredients For the Crust: 1 1/4 cup graham cracker crumbs 3 Tbsp. unsalted butter, melted 2 Tbsp. mashed banana 3 Tbsp. Stevia (or sugar) For the Pie: 1 box (1 oz.) sugar free, fat free banana cream pudding mix 1 box (1 oz.) sugar free, fat free vanilla pudding mix 1 box (3.4 oz.) coconut cream pudding mix 1 1/2 cup cold milk 1 container (8 oz.) Cool Whip, thawed 1/4 cup crushed pineapple, drained 3/4 cup shredded unsweet coconut Directions: First, start on the crust. Use a food processor to crush the graham crackers into fine crumbs. Combine 1 1/4 cup crumbs to the mashed banana, melted butter, and Stevia. Mix well then place mixture into glass or ceramic pie plate and push it down with a spoon until it forms a well-put-together crust on the bottom of the pie plate. Bake in 350 degree oven for about 12-16 minutes, until firm and golden brown. Remove from oven and allow to cool. Spread the shredded coconut out onto a baking sheet and bake in the oven until it's nicely toasted. This should take about 8-10 minutes, depending on how hot your oven gets. Be sure to toss the coconut and move it around every couple of minutes to assure an even toasty goodness throughout. Remove from oven and allow to cool. That is a happy toasted coconut face because it knows how delicious it's going to be when added to that pie. Combine the pudding mixes into a large bowl. Add the cold milk and stir until the mixture thickens. Mix in the Cool Whip and crushed pineapple. Once the coconut you toasted in the oven is cool, add in about 1/2 cup of it to the mixture and stir to combine. Spread this mixture out onto the cooled pie crust. Top with remaining beautifully toasted shredded coconut. Refrigerate at least 1 hour before serving. I know...the waiting might kill you--you just want to dive right into that gorgeous tropical pie, but trust me when I tell you the waiting is worth it. It has a better texture if the pie has time to set for a while. Go occupy yourself with creating a Pinterest board of dream beach vacations or perhaps setting up a lawn chair and changing into a cute sundress so you're ready to properly enjoy a slice of the tropical pie--relaxing and dreaming of a beach getaway. Healthy Recipe Tidbits
|
Happiness is HomemadeHi there! I'm Kaylin, a foodie, health nut, and recent college graduate. Born and raised in Arkansas, recently moved to Texas. On this blog you'll find a lot of tasty food and recipe ideas, healthy lifestyle suggestions, and random musings of my trials and tribulations of a 20-something. Most Popular---Cancer Sucks: How to Deal When a Relative is Diagnosed with Cancer
--And They Lived Happily Ever After --Single Serving Banana Funfetti Pudding --Gone but Not Forgotten --Holiday Spinach Salad with Cranberry Vinaigrette Archives
October 2015
|